
Capture Installation
Step 1 - Install Paper Stream (TWAIN)
- Via your This PC or My Computer Icon, go to \\img-capture\CaptureSV\Scanner Install\SETUP_DISC\Setup.exe (if you do not have access to this share, please contact Wendy at woodsw@wsu.edu)
- choose Custom, Next, choose PaperStream IP (TWAIN) or (TWAIN x64) follow prompts - restart PC.
Step 2 - Install Capture Client software
- The client only needs to be installed once and works for Test and Prod. Installation requires Administrator credentials on the machine.
- Go to one of the following: ** https://webcentertest.it.wsu.edu/dc-client
- Follow prompts - installs in a few minutes.
Capture Scanning Instructions
Scan
- Grab a stack of documents that need to be scanned. Remove all staples from the documents.
- Make sure scanner is turned on before opening the software and place documents into the scanner's ADF (auto document feeder).
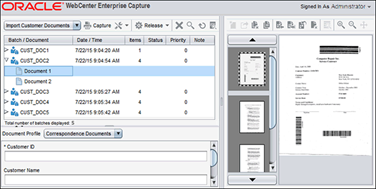
- Open the "WebCenter Enterprise Capture Client". There should be an icon on the desktop.

- Sign-in using your WSU system credentials (same that you would use to log into myWSU). Make sure that https://webcenter.it.wsu.edu is listed as the "Server Address".

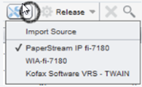
- Once the app is done initializing, click the dropdown arrow next to the tools icon on the left-hand side of the application window and make sure that Either PaperStream Twain (Your Scanner) or "Kofax Software VRS - TWAIN has been selected before proceeding on. Note: PaperStream comes with Fujitsu fi scanners and is a free product to use with new imaging. Not all scanners are PaperStream compatible. If PaperStream isn't an option, use Kofax.) PaperStream documentation is found online within the PaperStream Screens.
- When everything is ready, click "Capture" – the printer icon on the left-hand side of the screen.
- Choose whether you are doing one page (front only, two page (double sided or duplex) or variable all documents are the same doctype-all one search result line in Imaging) and then click Ok.

Arrange/Delete Pages
- Delete all blank pages and merge all pages into their corresponding documents. This button is located on the right-hand side of the application window. Each break is a new document. When you drag a page to merge with a document … the page brought over will automatically be placed at the top of the page; simply, drag it to its' proper place.
Index
- You may now begin indexing the metadata for this document. In the bottom left portion of the screen, your cursor will land in the ID field, enter the ID and hit tab or enter. This will fill in the Name, and other key identifiers of the WSU student, employee or vendor. Do this until all documents are filled in and properly indexed.
Release or Unlock
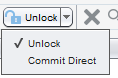
- Once everything has been indexed, make sure your batch is selected and then click "Release" or "Commit" and it will be released to Imaging and a wheel icon will appear to the left of the batch name. If you are not finished with the batch by the end of your shift or workday, highlight the batch and click "Unlock" (again on the left-hand side of the application window) … this way if you are unable to finish the process by the end of your shift, someone else can work on it/complete it.
Imaging
Annotations*
Once Logged into Imaging, to make an annotation, open the image in the basic viewer and click on the pencil icon.
![]()
This will bring up the advanced viewer to another screen. The advanced viewer is a Java application that requires Java installed on your machine. NOTE: If you do not have Java installed, please ask your technical resource to install the latest version of Java.
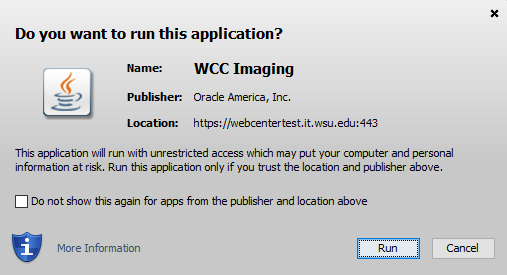
Once you see the above window, click Run and the Advanced Viewer will appear.

To make an annotation, click the icons such as the sticky note, text box, line, etc from the tool bar as shown above. This will make that action active in the image window. Once you are satisfied with your annotation, click the Save button at the far right of the screen (to the left of the help ? symbol). *Requires special security.
Desktop Integration*
Installation: https://webcentertest.it.wsu.edu/cs/idcplg?IdcService=DOWNLOAD_CLIENT_INSTALL&clientDownloadID=desktopclient
It takes you to a login for the /cs software. All you have to do is login with your NID and password and the download comes up in the bottom left side. desktop_content_setup.exe is the program it downloads. Open it and follow the prompts.
Once you have the Desktop Integration software installed on your pc, open MS Word and it should prompt you to accept the Add In. Once you have accepted it, go to the WebCenter Content toolbar and click on the Edit Server List Icon.
Click New and enter webcenter.it.wsu.edu in the server name, add an 's' in the http is the 2 places indicated above. Click OK. 
To test it for Word, take a document and click on the WebCenter Content toolbar. Choose Save As New option, click on Check-in Form and a Profile will come up. Choose Admissions. Scroll down to Imaging Application and fill in AVeiwerID (enter yourr WSUID), DocType (enter Communications), Type in your FirstName, LastName, SubDocType enter Test, Owner enter Admissions, WSUID enter yours, SSN enter yours, leave all else blank. Click Ok. It will be uploaded right then.
Once you make those entries into Word, all Office applications will see the server links.
*Requires special security.